本文共 4135 字,大约阅读时间需要 13 分钟。
差分约束系统
定义:全部都由两个未知量的差小于等于一个常量的组成的不等式组叫差分约束系统。
 这样的不等式要么无解,要么有无数解。且如果有一组解为{x1,x2。。。xn},因为所有数都加上一个定值他们的差不会变所以{x1+k,x2+k。。。xn+k}也为解,因为k可以任意取,所以解有无数个。
 差分约束系统的解法可以利用最短路径的三角公式,对于u->v来说,d[v]<=d[u]+w[u][v],也可以写为d[v]-d[u]<=w[u][v]。 其中d(u)和d(v)是从源点分别到点u和点v的最短路径的权值,w(u, v)是边u -> v的权值。
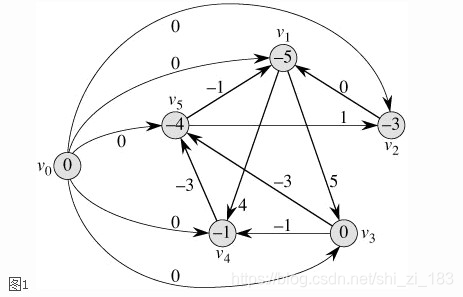
于是我们就可以把一个差分约束系统转化成一张图,每个未知数Xi对应图中的一个顶点Vi,把所有不等式都化成图中的一条边。对于不等式Xi - Xj <= c,把它化成三角形不等式:Xi <= Xj + c,就可以化成边Vj -> Vi,权值为c。最后,我们在这张图上求一次单源最短路径,这些三角形不等式就会全部都满足了,因为它是最短路径问题的基本性质嘛。 所谓单源最短路径当然需要一个源点,没有源点我们可以自己造一个,创造一个V0使它到每个点的有一条长度为零的连线。于是差分约束系统中就多出了一组不等式。 最后如图
最后如图  现在以V0为源点,求单源最短路径。最终得到的V0到Vn的最短路径长度就是Xn的一个解啦。从图1中可以看到,这组解是{-5, -3, 0, -1, -4}。当然这些解同时加上一个值也是满足这个差分约束系统的。
 如果这个图中出现了负权环,那么这个图就无法求出相应的最短路径,即这个差分系统无解。
其实,对于图1来说,它代表的一组解其实是{0, -5, -3, 0, -1, -4},也就是说X0的值也在这组解当中。但是X0的值是无可争议的,既然是以它作为源点求的最短路径,那么源点到它的最短路径长度当然是0了。因此,实际上我们解的这个差分约束系统无形中又存在一个条件:
X0 = 0 也就是说在不等式组(1)、(2)组成的差分约束系统的前提下,再把其中的一个未知数的值定死。这样的情况在实际问题中是很常见的。比如一个问题表面上给出了一些不等式,但还隐藏着一些不等式,比如所有未知数都大于等于0或者都不能超过某个上限之类的。比如上面的不等式组(2)就规定了所有未知数都小于等于0。 对于这种有一个未知数定死的差分约束系统,还有一个有趣的性质,那就是通过最短路径算法求出来的一组解当中,所有未知数都达到最大值。 那么如果在一个未知数定死的情况下,要求其它所有未知数的最小值怎么办?只要反过来求最长路径就可以了。最长路径中的三角不等式与最短路径中相反: d(v) >= d(u) + w(u, v) 也就是d(v) - d(u) >= w(u, v)所谓差分约束系统,具体来说,就是每行都具有 xi-xj >=|<= bi 的形式。约束的目标是使得目标函数xt-xs最大或最小。
例题poj3159 Candies
During the kindergarten days, flymouse was the monitor of his class. Occasionally the head-teacher brought the kids of flymouse’s class a large bag of candies and had flymouse distribute them. All the kids loved candies very much and often compared the numbers of candies they got with others. A kid A could had the idea that though it might be the case that another kid B was better than him in some aspect and therefore had a reason for deserving more candies than he did, he should never get a certain number of candies fewer than B did no matter how many candies he actually got, otherwise he would feel dissatisfied and go to the head-teacher to complain about flymouse’s biased distribution.
snoopy shared class with flymouse at that time. flymouse always compared the number of his candies with that of snoopy’s. He wanted to make the difference between the numbers as large as possible while keeping every kid satisfied. Now he had just got another bag of candies from the head-teacher, what was the largest difference he could make out of it?
Input
The input contains a single test cases. The test cases starts with a line with two integers N and M not exceeding 30 000 and 150 000 respectively. N is the number of kids in the class and the kids were numbered 1 through N. snoopy and flymouse were always numbered 1 and N. Then follow M lines each holding three integers A, Band c in order, meaning that kid A believed that kid B should never get over c candies more than he did.
Output
Output one line with only the largest difference desired. The difference is guaranteed to be finite.
Sample Input
2 2
1 2 5 2 1 4 Sample Output5
题意:每个人都会分得糖果,要求两个孩子之间的糖果差距应该尽可能的小,输入数据a b c 表示b孩子的糖果最多比a多c个,求n孩子最多比第一个孩子最多多少个题解:由题意可知b-a<=c;满足此公式,要求找到起点到终点的最少的差距,可以转化为最短路问题
本题中c为具体的糖果数一定大于零所以求最短路径时可以使用效率最高的迪杰斯特拉算法。
#include#include using namespace std;const int MAX = 160000;int dis[MAX], head[MAX];bool vis[MAX];int cnt = 0, n, m;struct Edge{ int v, w, next;}edge[MAX];void init(){ memset(head, -1, sizeof(head)); memset(edge, -1, sizeof(edge)); cnt = 0;}void addedge(int u, int v, int w){ edge[cnt].v = v; edge[cnt].w = w; edge[cnt].next = head[u]; head[u] = cnt++;}void dijkstar(int s,int en){ for (int i = 0; i <= n; i++) { dis[i] = MAX; } dis[s] = 0; while (!vis[en]) { int temp = MAX; int u = 0; for (int i = 1; i <= n; i++) { if (!vis[i]&&temp > dis[i]) { temp = dis[i]; u = i; } } vis[u] = 1; for (int i = head[u]; i != -1; i = edge[i].next) { int v = edge[i].v; int w = edge[i].w; if (vis[v])continue; dis[v] = min(dis[v], dis[w] + w); } }}int main(){ init(); int u, v, w; cin >> n >> m; for (int i = 1; i <= n; i++) { cin >> u >> v >> w; addedge(u, v, w); } dijkstar(1, n); cout << dis[n] << endl; system("pause"); return 0;}
对于有些题k的值有负值,则构建图后有负权边,当有负权环时,差分约束系统无解,判断无解和在有负权边情况下求最短路径应该使用spfa算法或bellmen_ford算法。
转载地址:http://irdmz.baihongyu.com/